|
|
|||||||||||
|
Common Features
Competitor Range
Club Range
General InfoInformation
|
WOW - By Mail Order
If you live where we have no retailer then you can still get a WOW™ saddle. Because of the nature of the product it is extremely easy to fit a WOW™ remotely. We can do this in one of two ways.
The following mails order guide is a 7 step guide to get the perfect WOW™ saddle for you and your horse. You will need nothing more than the gauge you can make in step 1. We are confident that we can make a saddle that you and your horse will be supremely comfortable in that if you or your horse are not satisfied you can return the saddle for refund. See our terms and conditions.
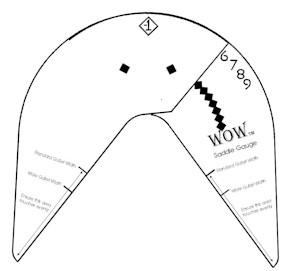
Step 1 - Make the saddle gauge You will need to print off the following Microsoft WORD Document WOW Saddle Gauge.doc or Acrobat Reader PDF WOW Saddle Gauge.pdf You will need to stick the two pages of the document onto a piece of stiff cardboard before cutting out the shapes as instructed in the document. Once you have done this the gauge should look like the one below and should help you access your horse.
Step
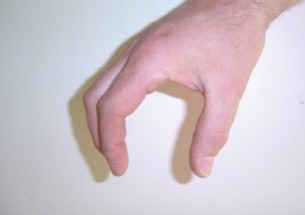
2 – Angle of the back We
must ascertain with angle of the horse’s back commonly termed the width
fitting. This term is somewhat confusing as it has nothing at all to do
with the width of the horse and more to do with the angle of the musculature
either side of the withers. Note; WHEN USING AN ANGLE GAUGE the gauge is held vertically against the third finger DO NOT ANGLE IT BACK AS THIS WILL GIVE A FALSE READING Using the gauge should be easy as long as you have stuck it on some stiff cardboard. Always ensure that the two smaller diamond windows align with the printed diamonds on the opposite half of the gauge to ensure accuracy. Note that on the gauge it tells you what part should be evenly touching the horse. Don't worry if the arch is not touching the top of the wither if your horse has a broad flat top to its' wither the gauge cannot touch it. We are only interested in the angle between the sides of the withers at this point.
Step
3 – Gullet Width
A
very important and much overlooked part of fitting a saddle correctly is the
width of the spinal process at the base of the withers. This is a junction
box for a lot of muscle groups. Pinch this area and the horse’s ability
to perform especially laterally will be hampered. The gullet has to be
wide enough in this area to give clearance for the muscles to work freely.
However if fitted too wide it will cause instability and at worst pressure
related problems because of insufficient muscle to support the saddle.
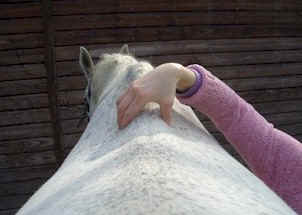
a. a.
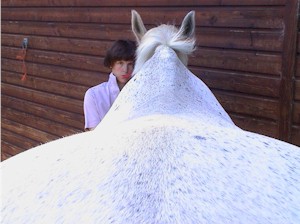
Look
at your horse’s back. Feel the width of the musculature at the base of
the withers . Then lift the horse’s head and feel again. If the
area becomes a lot wider when the horse’s head is pushed up you must use a
wider gullet to accommodate this muscle group.
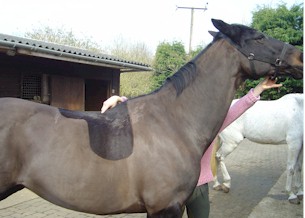
Look at these two different horses, whilst the grey has still some width to the
withers the difference is marked when compared to the bay.
This
is obviously easier done with two people. Hold the horse’s head
up. The person feeling the base of the wither area may not notice
any difference until the horse resists and tries to bring its head back
down. When this happens the horse engages the muscles that are used in
self carriage and they tighten and expand. If the difference between a
flaccid muscle and a tense muscle happens to be a marked change in the width of
the muscles at the base of the withers then you must specify a wide gullet in
your saddle.
If your horse’s width is like picture a. and stays as a. when
the head is raised then you will want a standard gullet
If your horse’s width starts out as a. and ends up more like b.
when the head is raised then you will require a wide gullet.
If your horse is already like b. then you have a wide gullet anyway. Step
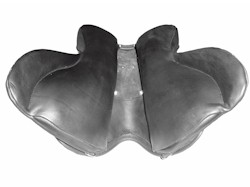
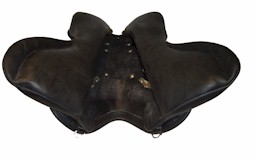
4 – Panel Front Profile - Front Gusset Yes/No? Background Info The WOW™ panel comes in four standard styles to accommodate the different types and shape of horse. The back of the panel does not vary (unless specified) the back gusset being a standard 2" depth. It is only the front portion of the panel that will change significantly. It is important to understand that a smaller panel can be used on a larger seat i.e. a 17" panel can be used on an 18" seat. This is very important when the rider requires the comfort afforded by the larger seat but the horse cannot accommodate an 18" panel. You can also commission special designs for such problem as very dipped backs and exceptionally wide spinal processes.
D Panel - Thoroughbred This panel will suit many shapes and sizes of horse. It works particularly well on Thoroughbreds because the panel is able to fill the "hollows" behind the shoulder and give clearance on the highest and sharpest of withers normally associated with this stamp of horse.
Defining Characteristics: Has a generous front gusset and large panel and a good three finger gullet at rear.
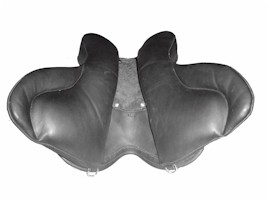
SD Panel - Low Wither This panel should be used on horses where they are round and flat in the back especially in the wither region and not much definition in the shoulders region.
Defining Characteristics: Has no front gusset and a smaller panel area (not support area) to keep the front of the saddle down and in contact with the horse. A good three finger gullet at rear.
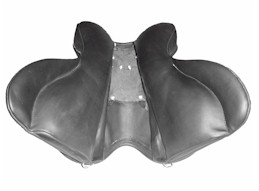
DWG Panel - Thoroughbred Wide Gullet This panel was originally designed to cope with stallion withers, wide, thick with a well defined difference between shoulders and saddle area. The wide gullet does not pinch the wither at its base where the horse can be very wide and the muscle groups very well developed. Also is a very useful panel for Arabs or any well muscled horse.
Defining Characteristics: Has a front gusset and a reduced TB panel area (not support area). The throat of the saddle is very wide reducing to a good three finger gullet at the rear.
SDWG Panel - Low Wither Wide Gullet This panel should be used on round flat backed horses where the wither whilst not prominent is wide and well muscled
Defining Characteristics: Has no front gusset and a smaller panel area (not support area) to keep the front of the saddle down and in contact with the horse. The throat of the saddle is very wide reducing to a good three finger gullet at the rear.
Some
horse’s like the Grey and Bay above have well defined scapulas and a place
where the saddle sits. When the scapula moves backwards under the saddle
as the foot goes forward there will have to be room for the scapula to move
into. In some cases the horse maybe described as hollow behind the
shoulder. This term seems to indicate there is something missing i.e.
muscle. That does not have to be the case; very fit well muscled horses do
tend to be very hollow behind the shoulder especial TB eventer types. This
type of shoulder profile will obviously require more padding and the use of a
panel with a front gusset assists this. The code we use for this type of
front gusseted panel is a “D” type panel.
Typical D panel (front gusset) type horse
The
other type of shoulder profile is undefined having a shoulder that in effect has
its own padding! The scapula can move freely backwards under the saddle, in
a sense, within the horse with very little change in the shape of the horse as
the scapula rotates. In this type of horse we use a panel with NO front
gusset its code is an “SD” type.
Typical SD panel (No front gusset) type horse
Step 4 – Length of Panel
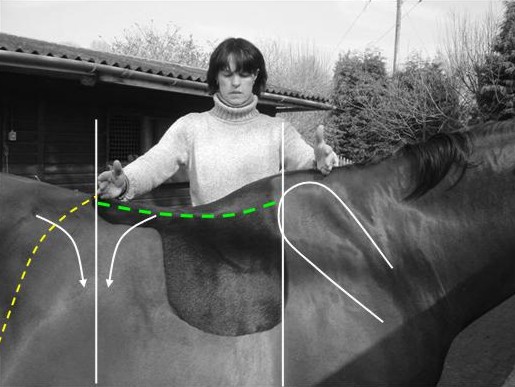
Maggie
is indicating the area that would require covering by the Equiform
template. Equiform allows you to mould the whole back profile on to a
thermoplastic sheet. The sheet can then be used by us or a saddler to help
choose the correct fit for the saddle. As
you can see it is important that the shoulders of the horse are covered if using
Equiform. A
saddle MUST only sit on the rib cage of the horse. The panel of the saddle
will sit slightly on the scapula and should end on or before the last (18th)
rib. This area is indicated by the two vertical white lines. To this
end we have to find out where the last rib is. Method
1 – Yellow dotted line (harder) Find
the last rib in the area where the yellow dotted line meets the edge of the
picture. Palpate upwards following the rib when you find it disappears
under the muscles that run along the back keep tracing that angle until you
reach the spine. Method
2 – Two curved arrows (Easier rule of thumb) The
arrows indicate the direction coat growth. At the point indicated the coat
grows backwards from the trunk and forward from the stifle. Where the two
growth directions come together it is possible to trace a line straight up.
Where it meets the backbone will be the last rib. NOW
USING
A TAPE
measure the distance from just on top of the scapula to the position of
the last rib following the back roughly where the middle of the saddle panel
will sit (indicated by the green dotted line). Check it on both sides as
you will find a difference because of asymmetry. Take the shortest
measurement and look at the table below.
Step 5 - Which Seat Size Do You Require Have a look at the seat styles page and decided what size and style you need. Remember that you can use a smaller panel on a larger seat. If your horse's back can only take a 17" No.1 panel and you require a 18" No.2 seat this can be done (but not the other way round) click here to see seat styles
Step 6 - Which Flap Style Have a look at the flap styles and choose the flap that is most suitable for you. If you take a leg length in trousers of 28" - 31" (71cm - 79cm) standards length should be correct for you. If your leg measurement is 32" - 34" (81cm - 87cm) you should be thinking about 2" (5cm) longer flap length. Remember that you can change the flaps on your saddle so if you are doing more than one discipline then you must ask yourself whether you will want two flap styles i.e. jumping and dressage or whether a general purpose flap would suit your requirements. Click here to see flap styles.
Step 7 - Choose Stirrup Leather Length If you measure your existing stirrup leather (only the leather) on your saddle when set to your riding length and add 3" - 4" (7.5cm - 10cm) then choose the length closest to your result from the following 24" (60cm), 28" (70cm) or 32" (80cm) If you do jumping and dressage you may find that you will need two lengths of stirrups.
In
Conclusion You
should now have all the information that you require to satisfy your horse.
Now the hard part comes in choosing the seat, the flap, the colours and finish.
What ever combination you choose we hope you and your horse enjoy WOW™ and
continue to do so through your riding life.
Result of Step 2 - Headplate No. (-1) to 9 = _____ Result of Step 3 - Wide Gullet Yes/No = _____ Result of Step 4 - Panel Length/Size = _____ Result of Step 5 - Seat Size No.0 16", No.1 17" or No.2 18" = _____ Seat Style Deep, Shallow or Flat = _____ Result of Step 6 - Flap style & Length standard, or +2" = _____ Result of Step 7 - Stirrup Leather Length 24" or 28" or 32" = _____
|
||||||||||
|
| About Us | Contact Us | Terms & Conditions | Patents | ©2009, First Thought Equine Limited, All Rights Reserved |
|||||||||||


 b.
b.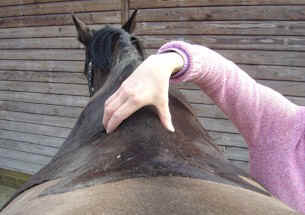
 b.
b.